Creating a Standalone StatusItem Menu
Introduction
This tutorial will show you how to create a StatusItem menu that will be available to all applications in the menu bar.
When you are done, you will have a simple menu that will appear on its own in the menubar as a "universal" background application, and will contain two menu items that let you enter a string into the Console and Quit itself. Note that you will need to code the functionality yourself for any menu item(s) you add or modify, but this will get you started.
Getting Ready
In order to use this tutorial, you will need:
• XCode, Version 3.1 (the version that comes with the iPhone SDK), or 3.0 (if you use 3.0 you will need to adjust the instructions to suit the earlier interface.
• Two icon files, one for the "normal" state and one for the "highlight" state. These icons should be 18x18 pixels in size, and should be done as PNGs so you can get the transparency you need. (The icons used for this tutorial are copies of the OS X folder icon).
Create a New Project

Launch XCode, and choose New Project... from the File menu.
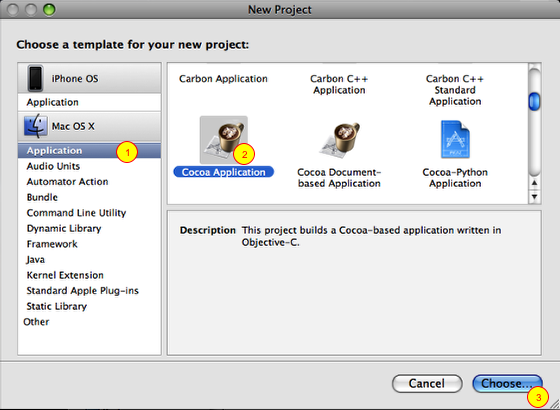
In the New Project window, you will be creating a Cocoa application, so (1) click Application under the Mac OS X title in the left list, then (2) scroll down until you see Cocoa Application and select it, and finally (3) lock in your choice by clicking the Choose... button.

Give the project a name, locate the place you want to save it in, and click Save. For this tutorial, we're using the name MyStatusItem.
Create the AppController Class
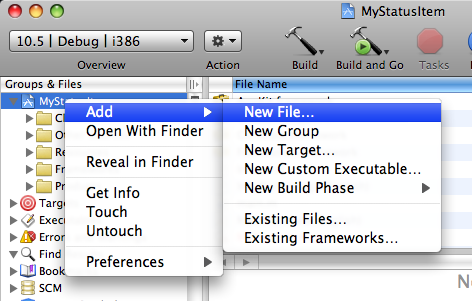
The main class that will be needed for this application is the AppController class. To create it, right-click on the MyStatusItem project in the Overview list, choose Add, then New File....
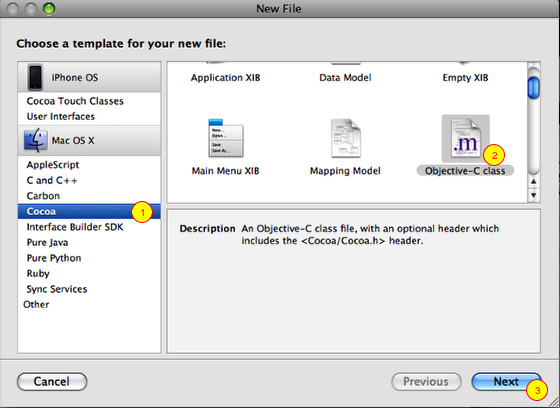
You'll be creating a Coca class, so (1) select Cocoa under the Mac OS X title on the left, then (2) scroll to and select the Objective-C class, and (3) click Next.
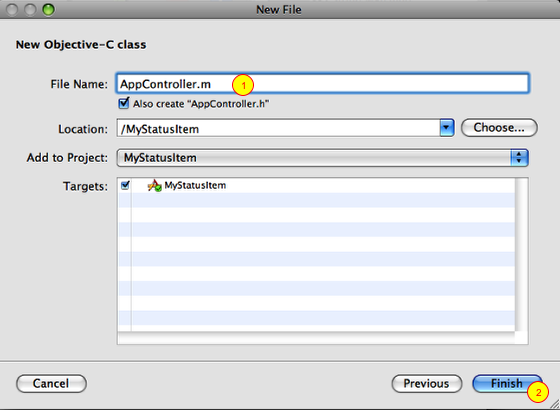
At this point, it will display "untitled.m" for the File Name, but you need to overtype the "untitled", and enter "AppController", so the File Name reads AppController.m. Click Finish to return back to the main project window.
Add Your Menu Icons to the Project
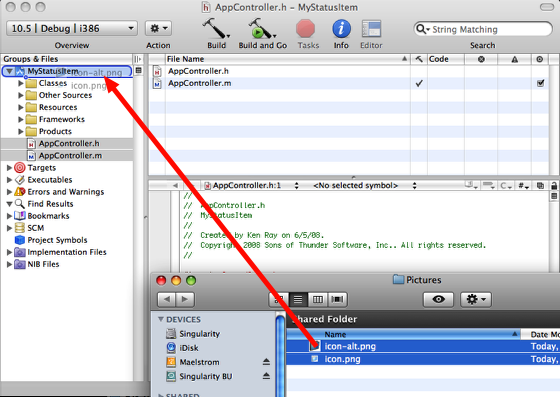
Locate your icons, select both of them, and drag them until the mouse is on top of the MyStatusItem project name in the Groups & FIles list. Release the mouse to confirm the inclusion of these icons in your project.
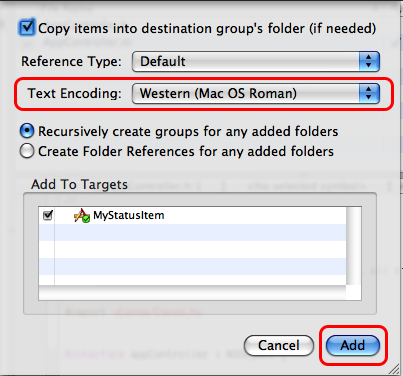
After you have dropped the icons into the project, you'll get this sheet; you can leave everything alone, or you can change the Text Encoding to a relevant encoding value (I've chosen Western here). Click Add to add the icons to your project.
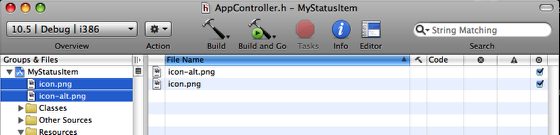
If everything went well, the icons will be added to your project and will appear in the Groups & Files area under your project as shown above.
Create the Interface
The first thing we need to do is create the file that will define the underlying connections between the interface elements, as well as specifying the actions to take when menu items are selected.
To do this, start by double-clicking on the AppController.h file in the MyStatusItem project in Groups & Files.
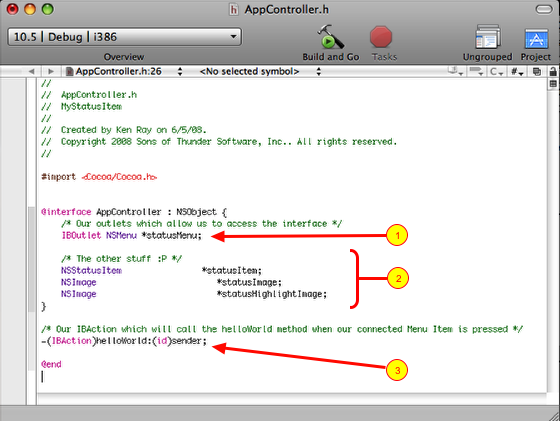
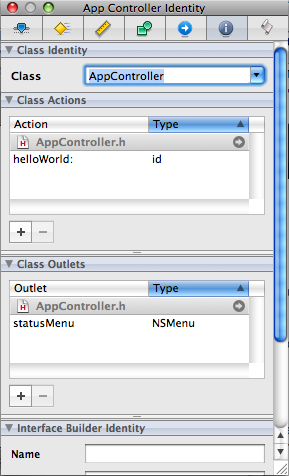
When you open this file, you will have an empty @interface AppController : NSObject block. You will need to (1) add the IBOutlets which will allow the applcation to interact with the interface, (2) add the definitions for the NSStatusItem and NSImage objects, and finally (3) add the IBAction which will define a helloWorld method which will be called when the connected menu item is selected.
Enter the following code:
#import <Cocoa/Cocoa.h>
@interface AppController : NSObject {
/* Our outlets which allow us to access the interface */
IBOutlet NSMenu *statusMenu;
/* The other stuff :P */
NSStatusItem *statusItem;
NSImage *statusImage;
NSImage *statusHighlightImage;
}
/* Our IBAction which will call the helloWorld method when our connected Menu Item is pressed */
-(IBAction)helloWorld:(id)sender;
@end
____________________________________________________
After entering the code above, Save and Close the editing window.
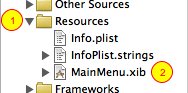
Open Interface Builder by (1) toggling open the Resources folder in the Groups & Files area, and (2) double-clicking on the MainMenu.xib file. Interface Builder will launch and present you with the screen below.

Because we are creating a background application that only displays a status item in the menubar, we don't need some of the default items that XCode adds to a new project. So you can select (1) the MainMenu object and (2) the Window object and then delete them by typing the Backspace or Delete key (or choose Delete from the Edit menu).
Add Objects to Your Project

You will need to add a couple of objects to your project in order to make the status menu work. To do this, you need to display the Library palette. Select Library from the Tools menu to open the palette.
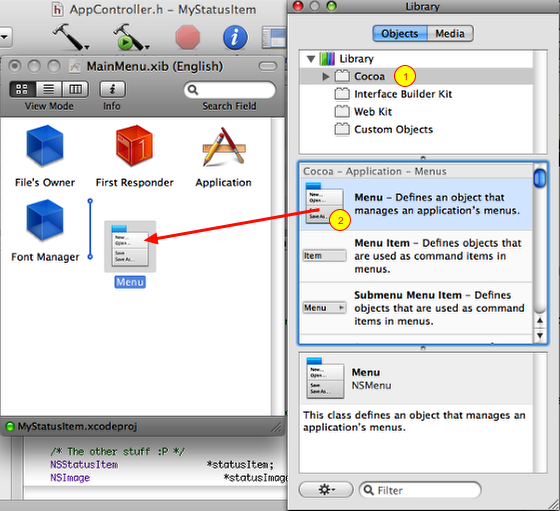
First thing to do is to create the menu object. To do this, (1) click on the Cocoa entry in the Library palette, and then (2) locate and drag a Menu object into your project window and release the mouse.
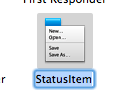
Click on the "Menu" name of the Menu object so that it opens for editing, and change the name of the Menu object to "StatusItem".
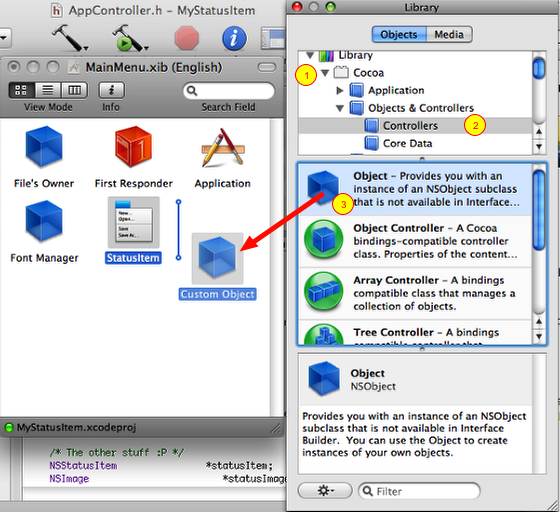
Go back to the Library palette, (1) toggle open the Cocoa item, toggle open the Objects & Controllers item, locate Controllers, and then (2) click on it. Then (3) click and drag the Object object to your project, and release the mouse button.
Optional: You can close the Library palette if you like, since we don't need it anymore.
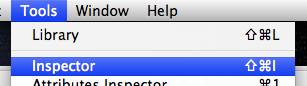
Go to the Tools menu, and select Inspector to bring up the Inspector palette.
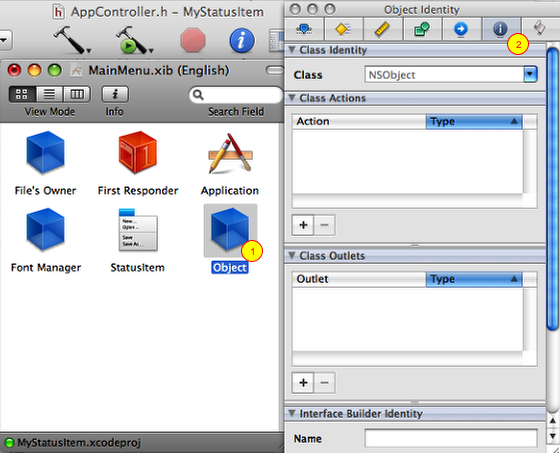
If the Object object is not selected, (1) click on it to select it. Then (2) click on the Identity button to display the class' identity, actions, and outlets.
To connect this object to the AppController class, click on the dropdown arrow and select "AppController", or you can click in the field and start typing to match the name "AppController".
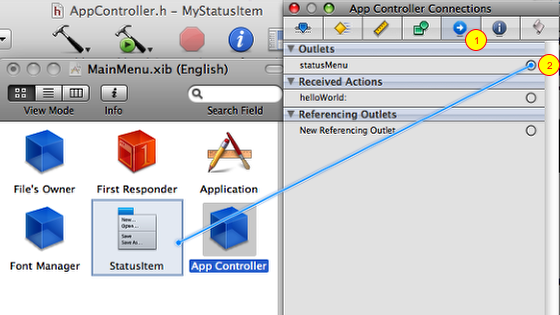
(1) Click on the Connections button in the Inspector palette, locate the statusMenu outlet, and then (2) click in the circle to the right side of the statusMenu outlet and drag. This will extend a blue connection line as you move the mouse. Drag the connection line until the StatusItem menu object is selected, and release the mouse.
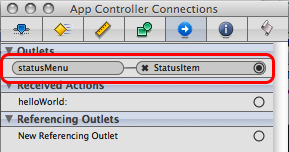
If you did this correctly, the statusMenu outlet will show a connection to the StatusItem menu object, as shown above.
Define the StatusItem Menu Items
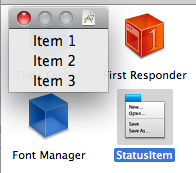
Double-click on the StatusItem menu object in your project in Interface Builder. This will display the default "Item 1", "Item 2", "Item 3" window shown above.
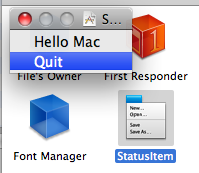
Change the menu to look like the one above by double-clicking on the names of items to open them for editing, and by clicking on an item to highlight it so you can delete it by hitting the Backspace/Delete key.
Oops!
• If you accidentally click to the left of the name, you'll be setting whether or not the item has a checkmark value. This cycles between checked, dashed, or empty, so keep clicking on it until it's empty.
• If you accidentlally double-click on the right side of the window across from a menu item, you'll be setting the menu item's key equivalent. You'll find that no matter what you type, you can't clear the key equivalent once you've set one.
To fix this, you'll need to make sure the Inspector palette is displayed on the Attributes tab (Tools -> Attributes Inspector, or click on the first icon (Attributes) at the top of the Inspector). On the Attributes pane, at the bottom of the list of attributes it reads Key Equiv. and across from that is the Clear button. Click it to remove the key equivalent you accidentally assigned.
Activating the Hello Mac Menu Item
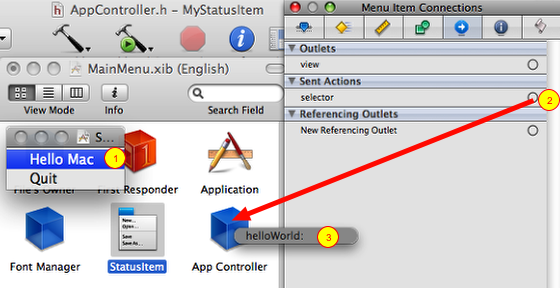
Make sure the Inspector is on the Connections tab, (1) click on the Hello Mac menu item to select it, then click and drag the connector line from the selector (under Sent Actions) to the App Controller object. When you release the mouse, you'll see a popup list of the available methods to link to. (3) Select the helloWorld: method by clicking on it.
FYI: The helloWorld method came from the IBAction code line we added to AppController.h file (see Create the Interface, above).
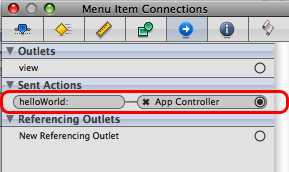
If you did this step properly, the Inspector should show the connection between the helloWorld method and the App Controller object as shown above.
Activating the Quit Menu Item
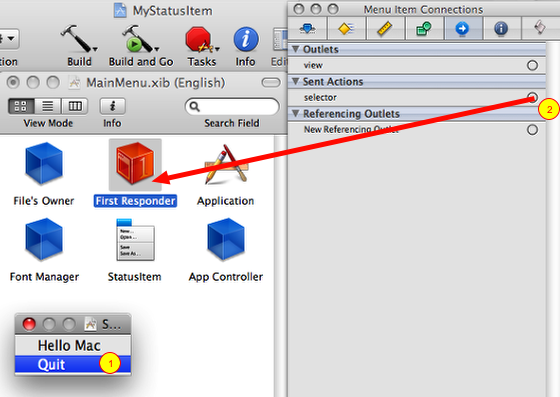
(1) click on the Quit menu item to select it, then click and drag the connector line from the selector (under Sent Actions) to the First Responder object. When you release the mouse, you'll see a popup list of the available methods to link to (see below).

In the popup menu of available built-in methods, scroll down and select terminate: - this will cause your application to quit when the Quit menu item is selected.
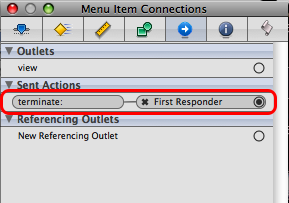
If you did this step properly, the Inspector should show the connection between the terminate method and the First Responder object as shown above.
Save your changes, then quit Interface Builder to return to your project in XCode.
Coding the StatusItem Menu
Double-click on the AppController.m file in the MyStatusItem project in Groups & Files .
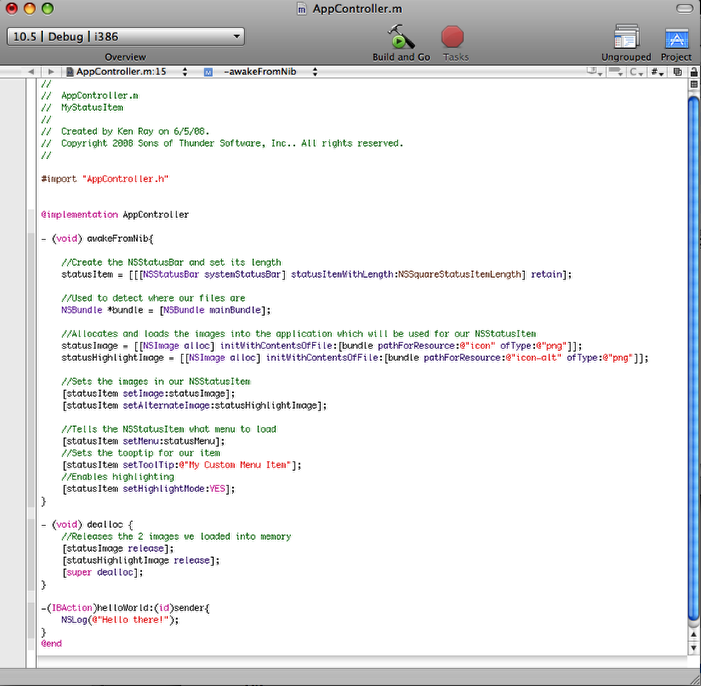
When you open this file, you will have an empty @implementation AppController block. Here is where we store our methods and define what our application actually does.
You need to (1) create the method awakeFromNib, which is called automatically when the interface (the NIB file) is opened by the application. Note that (2) the name of the icons used for the status item are referenced, so if you chose names other than "icon" and "icon-alt", you should make sure you make the proper changes here. You can also (3) specify the tooltip that will be displayed when the user hovers the mouse over your icon in the menubar.
(4) You will then need to make sure the NSStatusitem is unallocated and destroyed when you close your application to prevent memory leaks. To do this, create the dealloc method, which is also called automatically by your application.
Finally, (5) you need to create the IBAction code that will handle the methods called by your menu items. In this case, selecting Hello Mac will execute the helloWorld method. (The code above will (6) log an entry to the Console when the helloWorld method is executed.)
Enter the following code:
#import "AppController.h"
@implementation AppController
- (void) awakeFromNib{
//Create the NSStatusBar and set its length
statusItem = [[[NSStatusBar systemStatusBar] statusItemWithLength:NSSquareStatusItemLength] retain];
//Used to detect where our files are
NSBundle *bundle = [NSBundle mainBundle];
//Allocates and loads the images into the application which will be used for our NSStatusItem
statusImage = [[NSImage alloc] initWithContentsOfFile:[bundle pathForResource:@"icon" ofType:@"png"]];
statusHighlightImage = [[NSImage alloc] initWithContentsOfFile:[bundle pathForResource:@"icon-alt" ofType:@"png"]];
//Sets the images in our NSStatusItem
[statusItem setImage:statusImage];
[statusItem setAlternateImage:statusHighlightImage];
//Tells the NSStatusItem what menu to load
[statusItem setMenu:statusMenu];
//Sets the tooptip for our item
[statusItem setToolTip:@"My Custom Menu Item"];
//Enables highlighting
[statusItem setHighlightMode:YES];
}
- (void) dealloc {
//Releases the 2 images we loaded into memory
[statusImage release];
[statusHighlightImage release];
[super dealloc];
}
-(IBAction)helloWorld:(id)sender{
NSLog(@"Hello there!");
}
@end
____________________________________________________
After entering the code above, Save and Close the editing window.
Running Your Application For The First Time
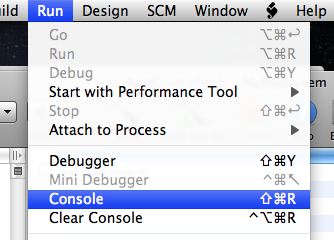
We're just about ready to run our application for the first time. So bring up the Console by selecting Console from the Run menu.
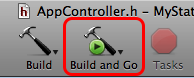
Now click the Build and Go button. It may take a minute or so for your project to compile, link, etc., but when you're done, you should see something like this:
Note that (1) a new application is running called "MyStatusItem", and that (2) your icon is appearing in the menu bar as a status item.
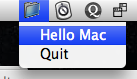
Click on your menu and select Hello Mac.
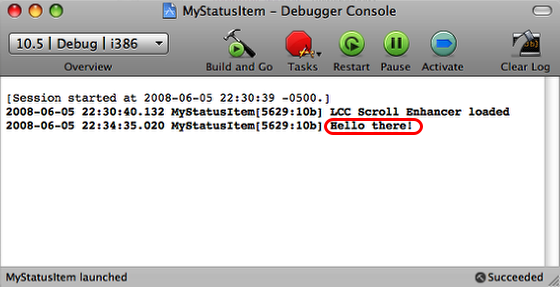
You should see an entry in XCode's Console window that shows the string from the NSLog() function in your IBAction for the helloWorld method.
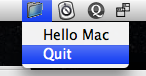
Now choose Quit from your menu. The MyStatusItem application should quit, and return you to XCode.
"Backgrounding" Your Application (If You Want To)
If you only want to have a status item displayed when your application is run, you will need to hide the application menu and the application itself from the Command-Tab list. To do this, you need to tell the Mac OS that you want to run this app as a "background application".
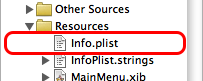
To do this, make sure the Resources folder is open under the Groups & Files area of your project, and then double-click on Info.plist. This will open the Property List Editor.
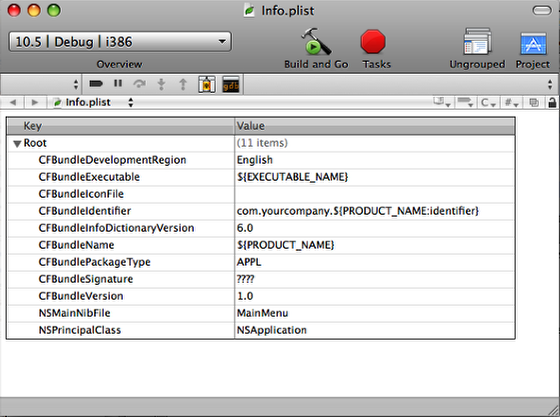
The Property List Editor should look something like this.

(1) Click on the last row in the list, and then (2) click on the + button. This will add a new row to the table.

Change the last row to look like the above, and then Save and Close the Property List Editor.
Testing Your Backgrounded Application

Click Build and Go again. This time the compilation should be quick.
You may not notice anything since it will look like you remained in XCode, however you'll see your status menu in the menubar; choosing the menu items will perform the same functions as before.
One Last Thing
If you need your statusItem menu to activate your statusItem menu application and bring it to the front (for example if you want to display a Cocoa window from your statusItem menu), add this chunk of code to the start of the IBAction that needs to do this:
[NSApp activateIgnoringOtherApps:YES];
On the other hand, if you need to bring some other application to the front, you can execute the equivalent AppleScript to activate the application (change "appName" to match the name of the application you want to activate):
NSString *bringAppToFrontScript = @"\
tell application \"appName\"\n\
activate\n\
end tell";
NSDictionary* errorDict;
NSAppleEventDescriptor *returnDescriptor = NULL;
NSAppleScript* scriptObject = [[NSAppleScript alloc]
initWithSource:bringAppToFrontScript];
returnDescriptor = [scriptObject executeAndReturnError: &errorDict];
[scriptObject release];
(Thanks to Geoffrey Matte for this additon.)
Conclusion
Well, there you have it... now all you need to do is modify the menu items in your project, and code up the functionality for them. Piece of cake, right? ;-)
I hope this tutorial has been informative, and I'd like to extend special thanks to semaja2.net for the "Creating a NSStatusItem - ObjectiveC" tutorial that was written for XCode 2.x and was the basis for this tutorial using XCode 3.x.
If you have comments or corrections, please direct them to:
Ken Ray
Sons of Thunder Software, Inc.
Email: kray@sonsothunder.com